Calling All Dessert Persons: Claire Saffitz Has a Cookbook for You
;void(0);)
 “My abiding appreciation for desserts goes way beyond just an affinity for sweet flavors,” says Claire Saffitz, author of DESSERT PERSON: Recipes and Guidance for Baking with Confidence, published by Clarkson Potter. “It’s rooted in an inborn belief that food is one of life’s pleasures and should be enjoyed—whether with friends or family at a celebration or solo on your couch. Maybe it’s as simple as a nibble of chocolate or as elaborate as a layer cake, but in any case, dessert is a gift I give to myself every day of the week (and sometimes twice a day—lunch dessert is definitely a thing!).
“As I practiced and improved my baking skills over the years, my attitude toward food and eating evolved as well. Through writing and developing the recipes for DESSERT PERSON, I realized that I was also sharpening and focusing my philosophy of desserts. While my cookbook is filled with baking recipes (mostly sweet, a few savory, and a couple of breakfast recipes thrown in), it also became my personal discourse on living and eating intuitively, freely, and fully. I know that baking can be stressful, but it should also be rewarding and fun. My hope is that DESSERT PERSON helps move you toward that goal. I hope you enjoy making these recipes as much as I have!”
In her first cookbook, Bon Appétit and YouTube star of the show Gourmet Makes offers wisdom, problem-solving strategies, and more than 100 meticulously tested, creative, and inspiring recipes.
DESSERT PERSON Featured Recipes (Perfect for Thanksgiving!)
Double Apple Crumble Cake
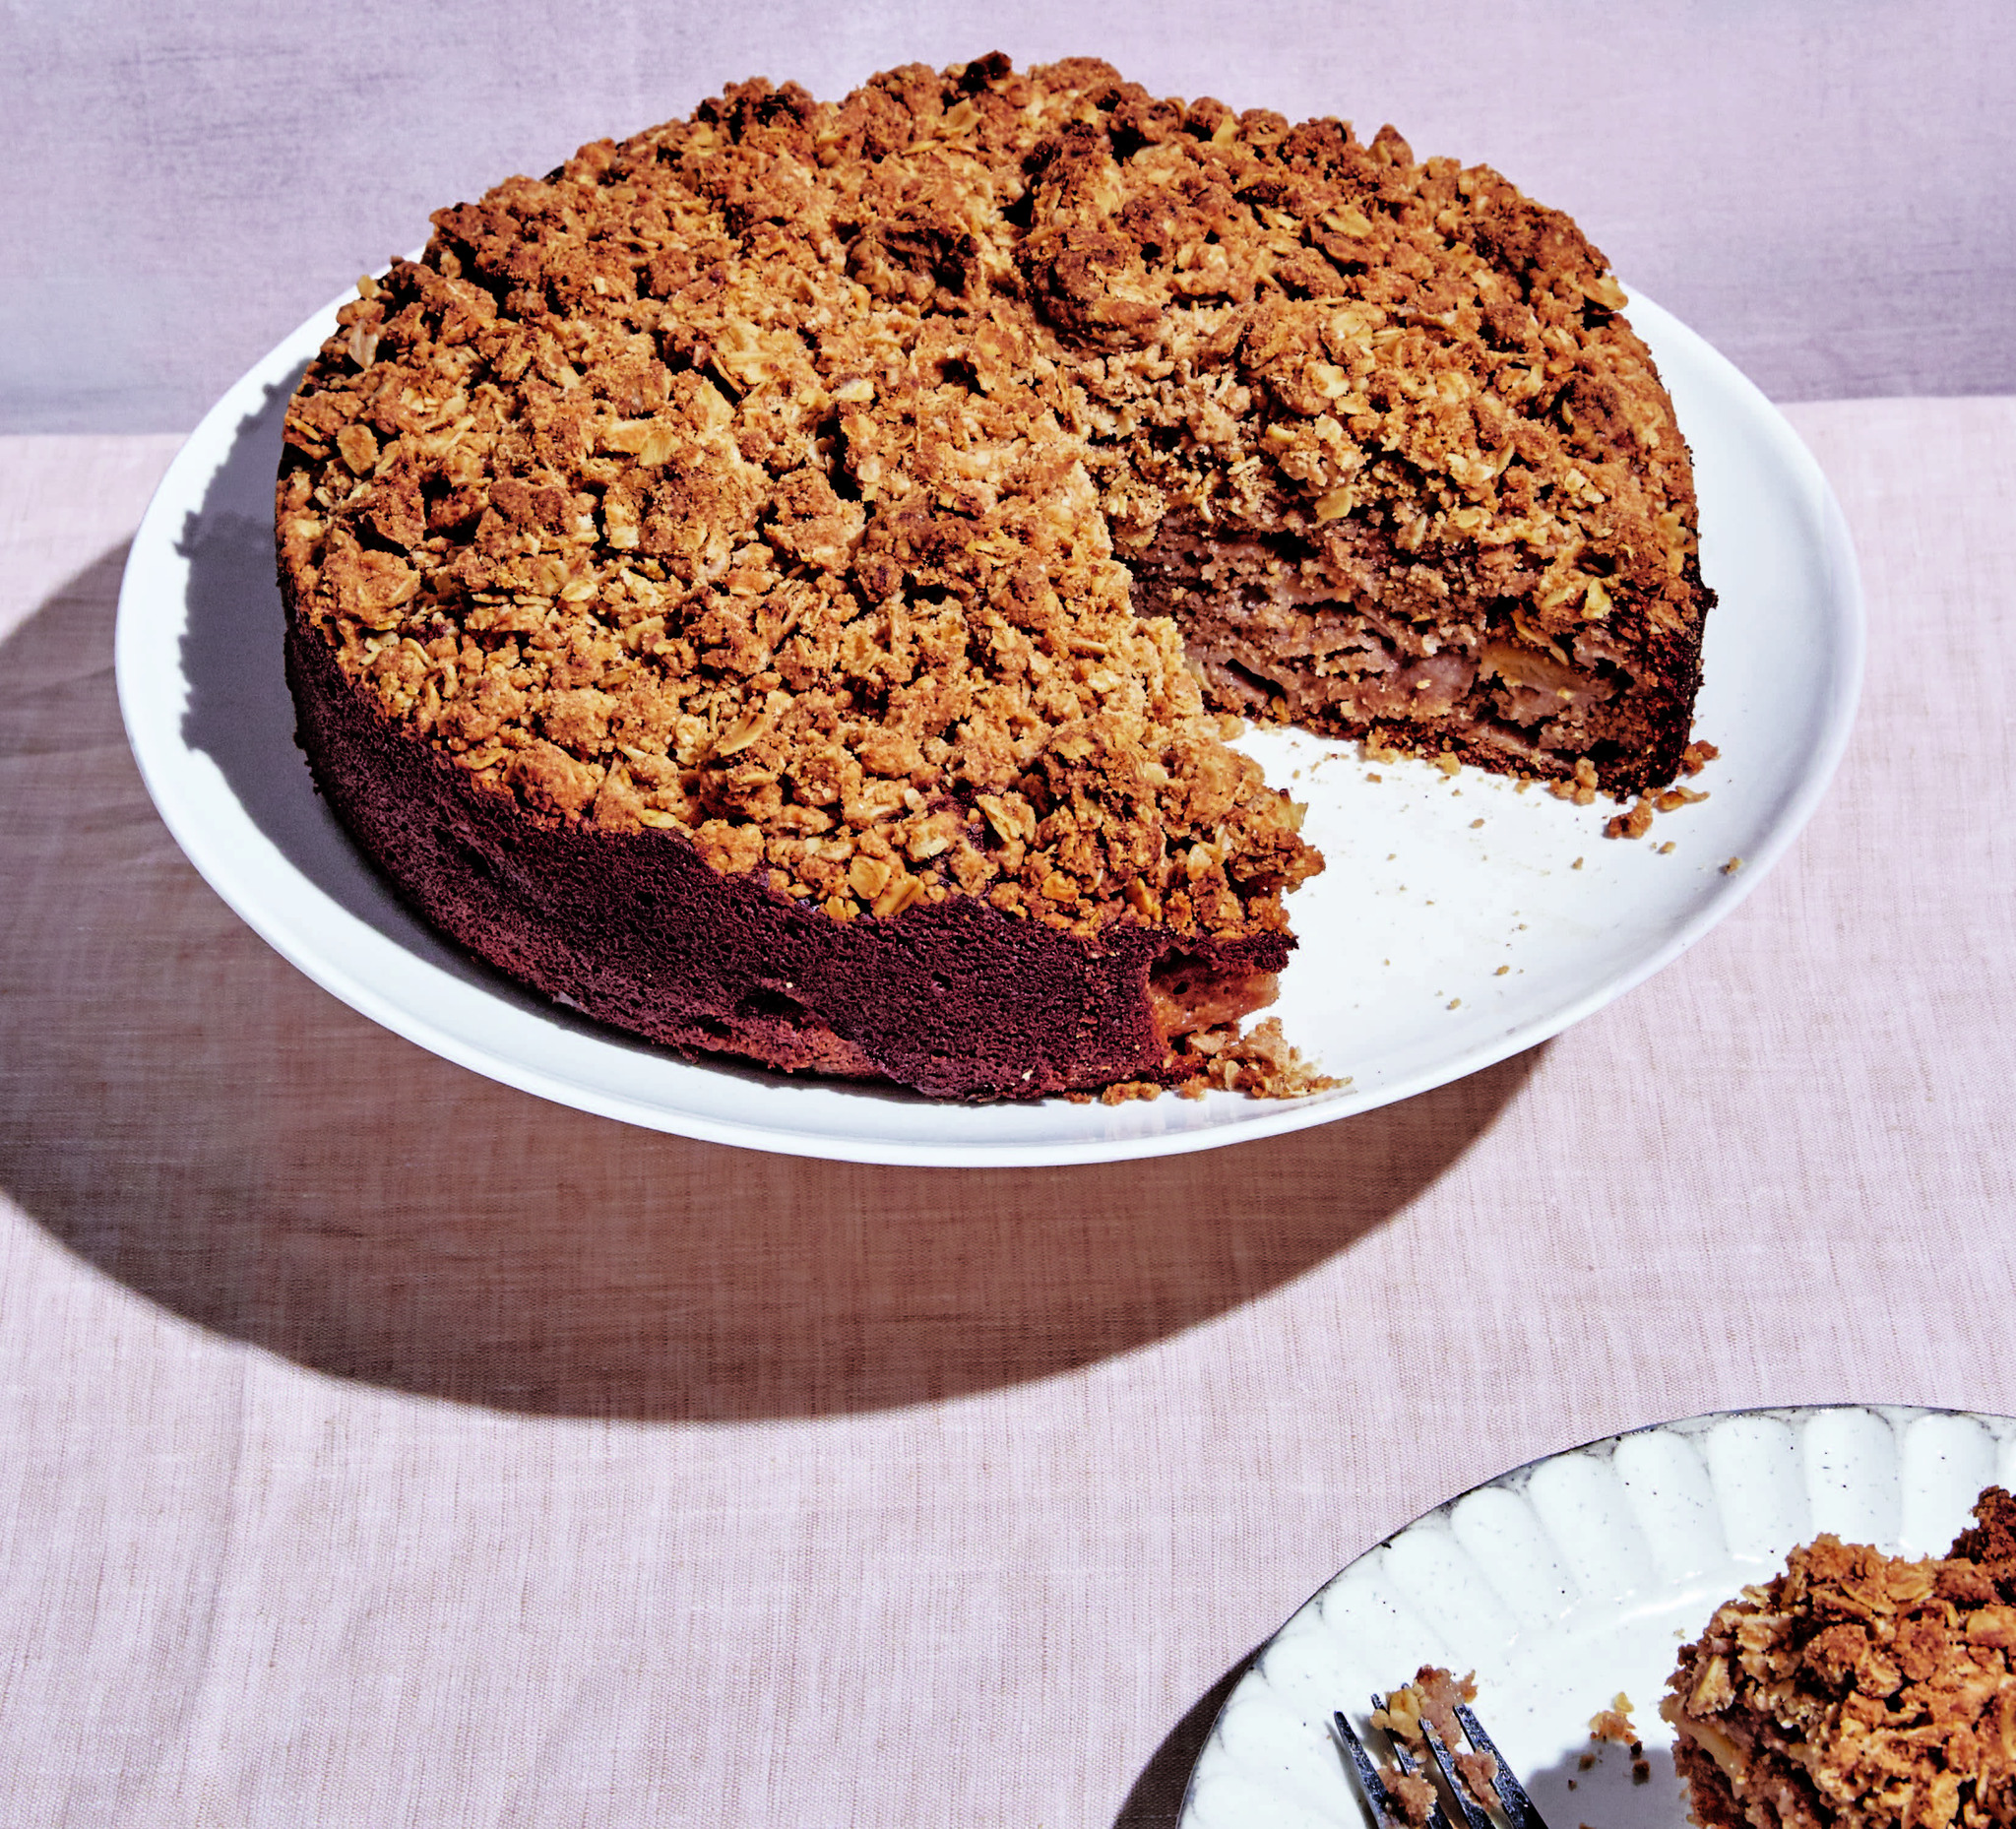 SERVES 10 to 12
Season: Fall / Winter | Active Time: 45 minutes (not including making the All-Purpose Crumble Topping) Total Time: 2 hours 15 minutes, plus time to cool | Difficulty: 2 (Easy, but with several steps)
Special Equipment: 9-inch spring-form pan*
Ingredients
- 3 tablespoons unsalted butter (1.5 oz / 43g)
- 4 medium Pink Lady apples (about 1¾ lb / 794g), peeled, halved, cored, and cut into ¼-inch-thick slices**
- Butter for the pan 2 cups all-purpose flour (9.2 oz / 260g) 1½ teaspoons ground cinnamon
- 1½ teaspoons baking powder (0.21 oz / 6g)
- ½ teaspoon baking soda ½ teaspoon Diamond Crystal kosher salt 1 cup apple butter (7.8 oz / 220g) ***
- 1 cup sugar (7 oz / 200g)
- ½ cup crème fraîche or sour cream (4.2 oz / 120g)
- ¼ cup neutral oil, such as vegetable or grapeseed (2 oz / 57g)
- 2 large eggs (3.5 oz / 100g)
- 2 teaspoons vanilla extract
- All-Purpose Crumble Topping
Directions
Precook the apples: In a medium skillet, heat the 3 tablespoons butter over medium heat. When the butter starts to foam, add the apples and cook, tossing often, just until the slices have begun to soften and turn slightly translucent, 10 to 15 minutes (it’s okay if some of them start to brown, which could happen if you’re using drier, cold-storage apples). Remove the skillet from the heat and set aside to cool.
Preheat the oven and prepare the pan: Meanwhile, arrange an oven rack in the center position and preheat the oven to 350°F. Lightly coat the bottom and sides of the springform pan with room temperature butter, then line the bottom with a round of parchment paper, smoothing to eliminate air bubbles. Set the pan aside.
Mix the dry ingredients: In a large bowl, whisk the flour, cinnamon, baking powder, baking soda, and salt to combine. Set aside. Mix the wet ingredients: In a medium bowl, whisk the apple butter, sugar, crème fraîche, oil, eggs, and vanilla until smooth.
Mix the wet ingredients into the dry: Make a well in the center of the flour mixture and pour in the apple butter mixture. Whisking from the center of the bowl outward, incorporate the dry ingredients into the wet just until you have an evenly mixed batter.
Fold in the apples: Using a large flexible spatula, fold the cooled apples into the batter, leaving any liquid behind in the skillet and mixing thoroughly to distribute the apples evenly.
Fill the pan and top with the crumble: Scrape the batter into the prepared pan and smooth the top. Sprinkle the crumble topping evenly over the batter, breaking up any pieces larger than a marble.
Bake and cool: Bake until the crumble is browned and a cake tester or toothpick inserted into the center of the cake slides easily through the apple slices and comes out clean, 1 hour 20 minutes to 1 hour 30 minutes. Transfer to a wire rack and let cool completely. Serve: Cut around the cake with a paring knife, then remove the ring. Use a serrated knife to cut the cake into slices.
The cake, well wrapped and stored at room temperature, will keep up to 4 days.
*Use a 10-inch springform pan if you don’t have a 9-inch. The cake will be slightly thinner, so start checking it for doneness after about 1 hour 15 minutes
**Use whatever variety of apple you prefer, just as long as it’s very firm and has some natural tartness. Try to avoid older apples that have been in cold storage for a long time and have a tendency to turn mealy when baked. To test an apple for freshness, press the tip of your thumb firmly into the skin. If you can’t make an indentation easily, it’s a good apple.
***Don’t use an apple butter with added sugar or spices. Try to find one that lists apples as the sole ingredient
Caramelized Honey Pumpkin Pie
 SERVES 8
Season: Fall | Active Time: 35 minutes (not including making the Flaky All-Butter Pie Dough) | Total Time: 1 hour 35 minutes, plus time to cool | Difficulty: 3 (Moderate)
Special Equipment:
9-inch pie plate, pie weights or 4 cups dried beans or rice (for parbaking)
Ingredients
- Flaky All-Butter Pie Dough, par-baked in a 9-inch pie plate and cooled
- 5 tablespoons unsalted butter (2.5 oz / 71g)
- ¹⁄³ cup honey (4 oz / 113g)*
- ¾ cup heavy cream (6 oz / 170g), at room temperature
- 4 large eggs (7 oz / 200g), at room temperature
- ¼ cup packed dark brown sugar (1.8 oz / 50g)
- 1 (15 oz / 425g) can unsweetened pumpkin puree (not pumpkin pie filling),preferably Libby’s**
- 2 teaspoons ground cinnamon
- 1½ teaspoons ground ginger
- 1 teaspoon vanilla extract
- 1 teaspoon Diamond Crystal kosher salt (0.11 oz / 3g)
- ½ teaspoon ground allspice
- ½ teaspoon ground nutmeg (preferably freshly grated), plus more for serving¼ teaspoon ground cloves***
- Softly whipped cream, for serving
Directions
Preheat the oven: Arrange an oven rack in the center position and preheat the oven to 325°F. Place the par-baked pie crust on a foil-lined rimmed baking sheet and set aside.
Brown the butter: In a small saucepan, cook the butter over medium-low heat, stirring and scraping the bottom and sides constantly with a heatproof spatula. The mixture will sputter as the water boils off. Continue to cook, stirring and scraping, until the sputtering subsides, the butter is foaming, and the solid bits turn a dark brown, 5 to 7 minutes.
Caramelize the honey: Remove the saucepan from the heat and immediately add the honey (to prevent the butter from burning), stirring to combine. Return the saucepan to medium heat and bring to a boil. Continue to cook, swirling often, until the mixture is darkened slightly and has a savory, nutty smell, about 2 minutes. Remove the saucepan from the heat and slowly stream in the heavy cream, stirring constantly (be careful—the mixture may sputter) until it’s smooth. Set the warm honey mixture aside.
Make the pumpkin filling: In a large bowl, whisk the eggs to break up the whites and yolks, then add the brown sugar and whisk vigorously until the mixture has lightened in color by a shade or two, about 1 minute. Whisk in the pumpkin, cinnamon, ginger, vanilla, salt, allspice, nutmeg, and cloves until smooth. Slowly stream in the warm honey mixture, whisking constantly, until the filling is completely homogenous.
Fill the crust and bake: Pour the filling into the par-baked crust all the way to the top. (Depending on the height of your crust, you may have some leftover filling, which I recommend you keep! **** Ever so carefully transfer the pie to the center rack and bake until the filling is set and puffed around the edges and the center wobbles gently, 45 to 60 minutes.
Cool the pie gently: Turn off the oven and prop the door open with a wooden spoon. Let the pie cool completely in the oven. Doing so will allow it to cool gradually, which will prevent cracking on the surface.
Serve: Slice the pie into wedges and top each piece with softly whipped cream. Grate a bit of fresh nutmeg over the cream and serve.
The pie, covered and refrigerated, will keep up to 3 days but is best served on the first or second day (the crust will soften over time).
*Use a good-quality, dark-hued honey. The more strongly flavored the better, so it stands out against the pumpkin. Just don’t use buckwheat or chestnut honey, which are too intense.
**I don’t bother making my own puree from fresh pumpkin since I’ve never found it worth the effort. Canned pumpkin like Libby’s is lower in moisture and produces a perfectly smooth, flavorful pie.
***I like this combination of warm spices, but if you are missing one, can’t find them all at the store, or just don’t like certain spices, feel free to come up with your own blend.
****Bake any remaining pumpkin filling separately in a small ramekin. I like to do this to prevent ingredient waste, and also because it allows me to sample the filling prior to cutting into the pie!
Flaky All-Butter Pie Dough
Season: All | Active Time: 25 minutes for the dough, plus another 30 minutes for a par- or fully baked crust
Total Time: 3 hours for the dough (includes 2 hours 30 minutes for chilling), plus another 1 hour 20 minutes to 1 hour 30 minutes for a par- or fully baked crust | Difficulty: 2 (Easy)
Makes enough for one 9-inch pie or tart crust.
Special Equipment:
Pie weights or 4 cups dried beans or rice (for par-baking)
Ingredients
- 1 stick plus 2 tablespoons unsalted butter
- (5 oz / 142g), chilled
- 1½ cups all-purpose flour (7 oz / 200g), plus more for rolling out
- 1 tablespoon sugar (0.46 oz / 13g)
- ¾ teaspoon Diamond Crystal kosher salt
Directions
DO AHEAD The dough, wrapped tightly in plastic and refrigerated, will keep up to 3 days or can be frozen up to 2 months (place in a resealable plastic bag before freezing). Let the frozen dough thaw overnight in the refrigerator before using. The par- or fully baked crust, covered and stored at room temperature, will keep for 1 day.
Prepare the ice water and slice some of the butter: Fill a 1-cup liquid measure with ice water and refrigerate it while you assemble the pie dough. Cut a 5 tablespoon block of the butter (2.5 oz / 71g) crosswise into ⅛-inch thick slices (so you have lots of thin butter squares) and refrigerate. Mix the dry ingredients: In a large bowl, whisk together the flour, sugar, and salt to combine.
Work the butter into the dry ingredients: Cut the remaining 5 tablespoons butter (2.5 oz / 71g) into ½-inch cubes and toss in the flour mixture to coat. [1] Quickly and firmly use your fingertips to smash the butter pieces into the flour, flattening them and working into smaller bits until the largest pieces are no bigger than a pea. 2 [2,3] Remove the butter slices from the refrigerator, add them to the flour mixture, toss to coat, then flatten between your thumbs and fingertips into thin sheets, letting them break apart if that’s what they want to do. Once you’ve worked in all the butter, you should have a very coarse, slightly yellowed mixture filled with some larger pieces of butter and some very small bits.
Bring the dough together: [4] Slowly drizzle 5 tablespoons of the ice water (avoiding any ice) into the mixture, tossing constantly with a fork to incorporate. [5] Switch to your hands and toss the mixture several times until shaggy pieces of dough form, then knead the mixture inside the bowl a few times to bring it together (the dough will look very clumpy and dry, with loose bits). Line the work surface with a sheet of plastic wrap, then transfer any large clumps of dough to the plastic. [6] Tossing again with a fork, drizzle more ice water 1 teaspoon at a time into the bowl with the remaining flour mixture until only a few dry spots remain, then knead with your hands to bring it together into a dough. Transfer the last bits of dough to the plastic wrap.
Wrap and chill the dough: [7] Pat the dough into a ¾-inch-thick square or rectangle. [8,9] Wrap tightly in the plastic, pressing out any air, and press down on the dough with the heel of your hand to flatten it further and force it into the corners of the plastic. Refrigerate for 2 hours. The pie dough is technically ready to use at this point, but proceed through the next step, which will make it extra flaky. Roll out and fold the dough: Let the dough sit on the counter for 5 minutes to soften slightly.
Unwrap it and place on a lightly floured surface. Use a rolling pin to beat the dough all across the surface to make it more pliable. [10] Dust the top and underside of the dough with more flour, then roll it out, dusting with more flour as needed, into a rectangle that’s about three times longer than it is wide and between ¼ and ½ inch thick. 3 [11,12] Fold the dough in thirds like a letter (this makes more butter layers, which create a flaky texture), then wrap tightly in plastic. Refrigerate the dough until it’s relaxed, at least 30 minutes and up to 3 days. It’s now ready to use. If the recipe calls for a lined pie plate, a par-baked crust, or a fully baked crust, follow the directions below. If baking, preheat the oven and prepare a baking sheet: Arrange an oven rack in the center position and preheat the oven to 425°F. Line a rimmed baking sheet with foil and set aside
Line a 9-inch pie plate: Let the pie dough sit at room temperature for about 5 minutes to soften slightly, then beat it across the surface again with a rolling pin to make it more pliable. [13] Dust the top and underside of the dough with more flour, then roll it out, dusting with more flour as needed, into a 13-inch round that’s about ⅛ inch thick. Roll the pastry onto the rolling pin. [14,15] Unroll the round onto a 9-inch pie plate, preferably glass, letting the pastry slump gently down the sides into the bottom. Firmly press the pastry into the bottom and up the sides of the plate, ensuring contact everywhere and taking care not to stretch it. 4 [16] Use scissors to trim around the edge of the pastry, leaving a ½-inch overhang (discard the scraps). [17] Tuck the overhang underneath itself all the way around so you have a lip of double-thick pastry resting just around the rim of the pie plate. [18]
Press down firmly around the rim to seal, then crimp the crust all the way around, using the thumb of one hand and the thumb and forefinger of the other, flouring your fingers if needed to prevent sticking. Instead of a crimp, you can also use the tines of a fork to create hash marks around the rim.
Bake the weighted crust: Freeze the lined pie plate until the dough is very firm, about 10 minutes, then prick the bottom of the pastry in several places with a fork to prevent the crust from puffing up. Line the inside of the pie plate with two pieces of foil, arranged perpendicularly, so the overhang of the foil completely covers the edge of the crust. Fill the pie plate with pie weights, dried beans, or rice and place on the prepared baking sheet. Bake in the center of the oven until the edge of the crust is set and starting to turn golden when you peek under the foil, 25 to 30 minutes. Remove the plate from the oven and carefully lift the foil and pie weights out of the crust. Reduce the oven temperature to 350°F.
To par- or fully bake the crust: Return the pan to the oven and bake until the crust is golden brown all over, another 20 to 25 minutes for a par-baked crust, or until deep golden brown all over, 10 to 15 minutes longer, for a fully baked crust. 6 Set the crust aside to cool.